API & UI automation Framework Using Cucumber BDD Maven – Complete Step by Step Guide
Overview of Java and Cucumber
Java
Java is a general-purpose programming language that is used for a wide variety of applications, including web development, mobile development, and enterprise applications. It is a compiled language, which means that it is converted into machine code before it is executed. Java is a very popular language, and many libraries and frameworks are available for it.
Cucumber
Cucumber is a tool for behaviour-driven development (BDD). BDD is a software development process that focuses on the behaviour of the software, rather than the implementation details.
Cucumber allows you to write tests in a natural language that is easy to understand for both technical and non-technical stakeholders.
Java and Cucumber can be used to create BDD tests for Java applications. This allows you to write tests that are easy to understand and maintain, and that accurately reflect the behavior of your application.
Here are some of the benefits of using Java and Cucumber together:
- Easy to understand and maintain: The natural language syntax of Cucumber makes it easy to write tests that are easy to understand for both technical and non-technical stakeholders.
This makes it easier to get buy-in from stakeholders, and it also makes it easier to maintain the tests over time. - Accurately reflects the behaviour of the application: Cucumber tests are written in a way that is very close to the actual behaviour of the application.
This makes it more likely that the tests will accurately reflect the behaviour of the application, and it also makes it easier to identify and fix bugs. - Flexible: Cucumber can be used with a variety of different programming languages, including Java, Ruby, and Python. This makes it a very flexible tool that can be used in a wide variety of projects.
Here is an example of a Cucumber test for a Java application:
Feature: Login

  Scenario: Login with valid credentials
    Given I am on the login page
    When I enter my username and password
    And I click the login button
    Then I should be logged in
This test is written in a natural language that is easy to understand. It specifies the behaviour of the application in a way that is very close to the actual behaviour. This makes it a very effective way to test the application and identify and fix bugs.
If you are looking for a way to write BDD tests for your Java applications, then Java and Cucumber are a great combination. They are both powerful tools that can help you to write tests that are easy to understand, maintain, and accurate.
Tools
- Maven
- IntelliJ (IDE)
- Selenide for UI automation
- cucumber
- Junit
- Gherkin language for writing cucumber scenario
- Logger for logging
- Allure for Reporting
Step-by-Step Framework Creation:
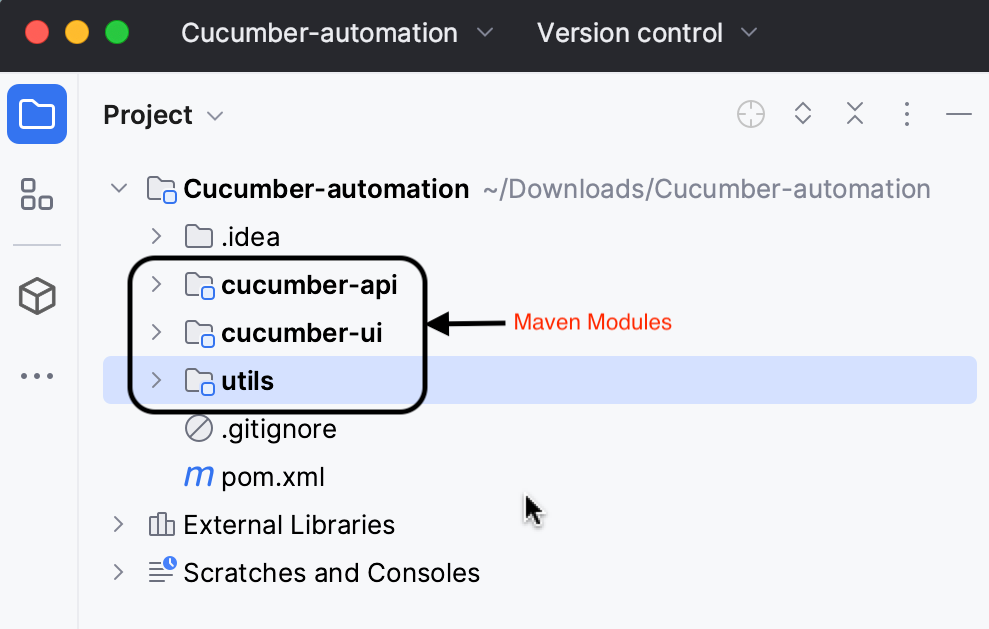
In this tutorial, I will use the Maven modular framework. First, creates the parent project.
Step 1: Create Cucumber-automation Project
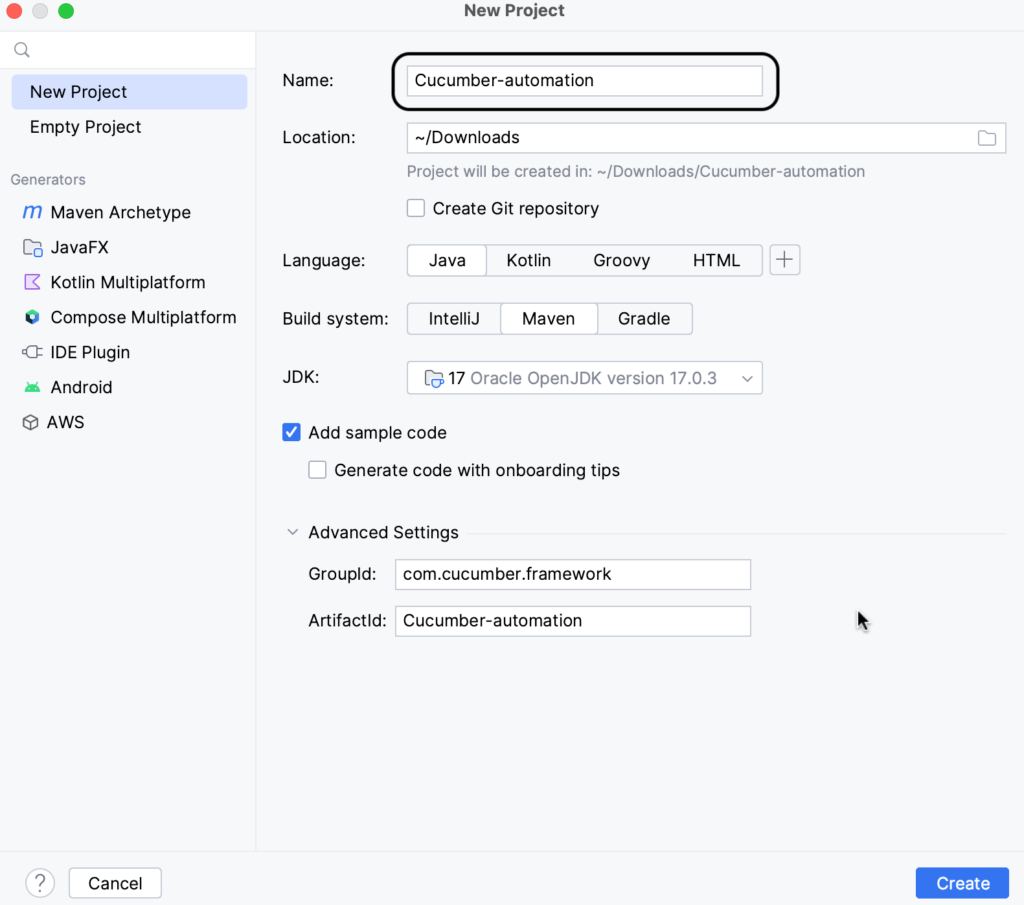
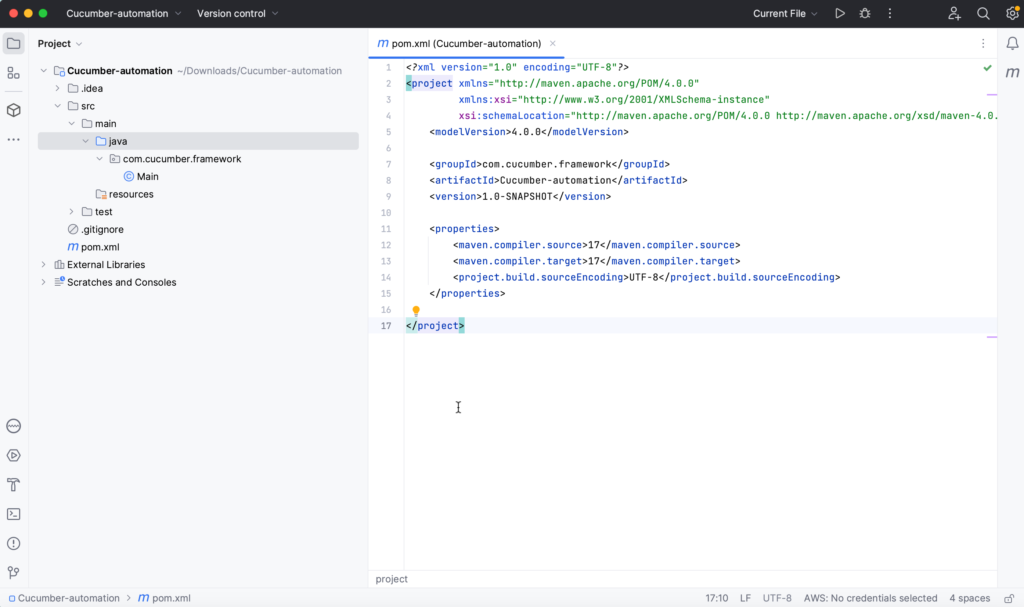
Step 2: Created Maven Project
Step 3: Add cucumber-api module
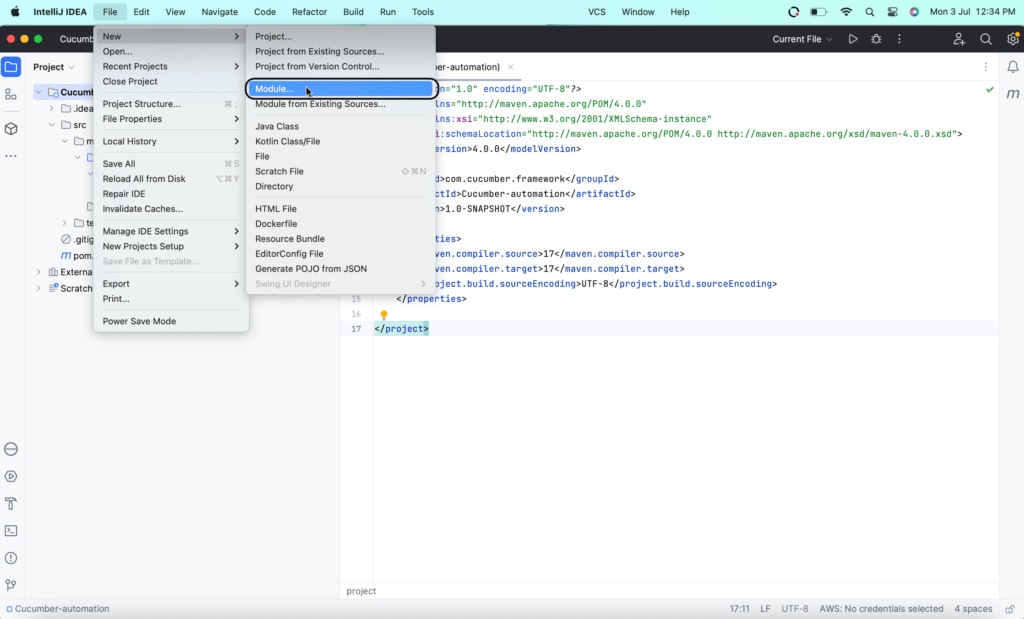
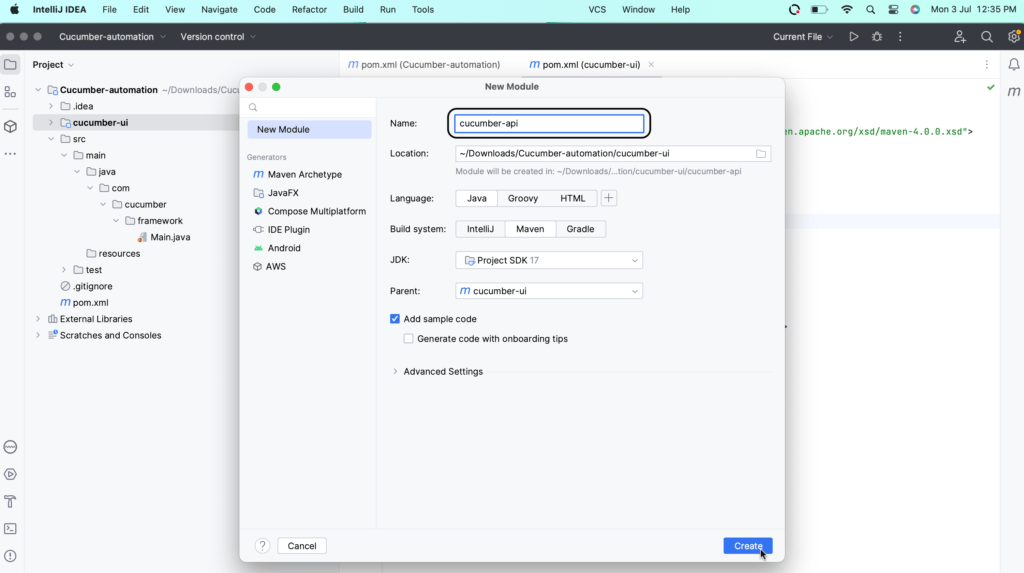
Step 4: Add cucumber-ui module
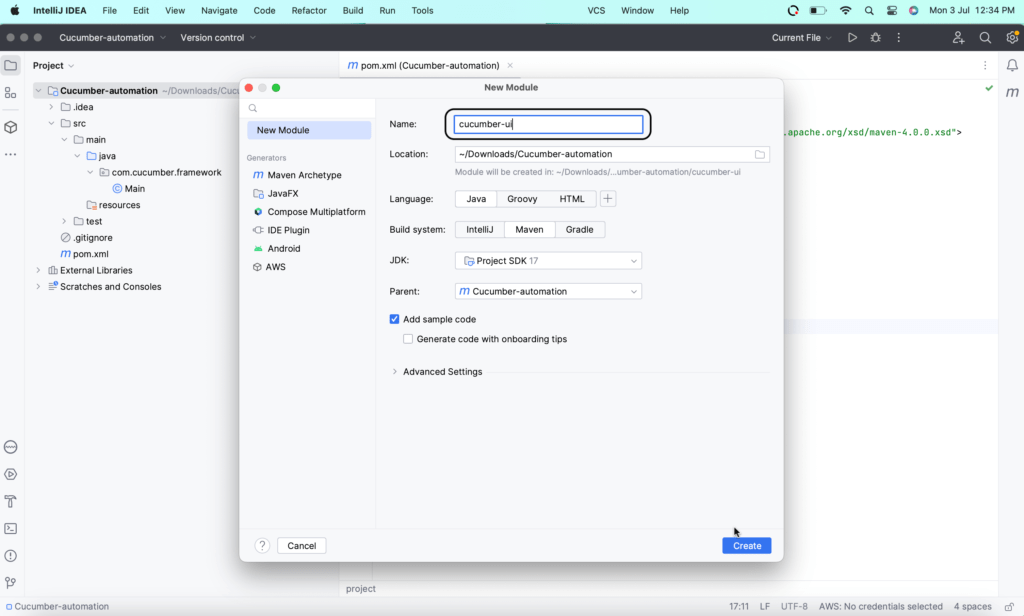
Step 5: Add utils modules also in the same way
Now, the project is set up now, Time to add maven dependencies which are required to start the API automation.
Add Maven Dependencies
Add common dependencies in the parent pom file and others that are API or UI specific we can add in the module’s pom.xml file.
Add the below dependencies in the pom.xml file:
<dependencies>
        <dependency>
            <groupId>org.projectlombok</groupId>
            <artifactId>lombok</artifactId>
            <version>1.18.28</version>
            <scope>provided</scope>
        </dependency>
        <dependency>
            <groupId>io.cucumber</groupId>
            <artifactId>cucumber-java</artifactId>
            <version>7.8.1</version>
        </dependency>
        <dependency>
            <groupId>io.cucumber</groupId>
            <artifactId>cucumber-core</artifactId>
            <version>7.8.1</version>
        </dependency>
        <dependency>
            <groupId>io.cucumber</groupId>
            <artifactId>cucumber-junit</artifactId>
            <version>7.8.1</version>
            <scope>test</scope>
        </dependency>
    </dependencies>
Lombok library we are suing to remove the boilerplate code from the framework.
Add rest-assured dependency in the cucumber-api module pom.xml
 <dependencies>
        <dependency>
            <groupId>io.rest-assured</groupId>
            <artifactId>rest-assured</artifactId>
            <version>5.3.1</version>
            <scope>test</scope>
        </dependency>
    </dependencies>
Create the Utility classes in the Utils module
So here we are making the full-fledged framework with all capabilities so first create some utils in utils modules which will help us to automate our apis smoothly.
Adding Logger
First, we will set up the logger so that we can add logging statements in our framework along with developments.
We will use Log4j. Add the below dependencies in your pom.xml
<dependency>
     <groupId>org.apache.logging.log4j</groupId>
     <artifactId>log4j-core</artifactId>
      <version>2.20.0</version>
</dependency>
<dependency>
      <groupId>org.apache.logging.log4j</groupId>
      <artifactId>log4j-api</artifactId>
       <version>2.20.0</version>
</dependency>
Add Log4j2.properties file in cucumber-api and cucumber-automation at src/main/java/resources folder.
name=PropertiesConfig
appenders=console, file
appender.console.type=Console
appender.console.name=STDOUT
appender.console.layout.type=PatternLayout
appender.console.layout.pattern=[%-5level] %d{yyyy-MM-dd HH:mm:ss} [%t] %c{1} - %msg%n
appender.file.type=File
appender.file.name=FileLogger
appender.file.fileName=api.log
appender.file.layout.type=PatternLayout
appender.file.layout.pattern=[%-5level] %d{yyyy-MM-dd HH:mm:ss} [%t] %c{1} - %msg%n
appender.file.append=true
rootLogger.level=trace
rootLogger.appenderRefs=stdout, file
rootLogger.appenderRefs.file.ref=FileLogger
rootLogger.appenderRefs.stdout.ref=STDOUT

rootLogger=debug, STDOUT, FileLogger
To add Logger you can take reference of below code example:
LoggerDemo.java

api.log file example
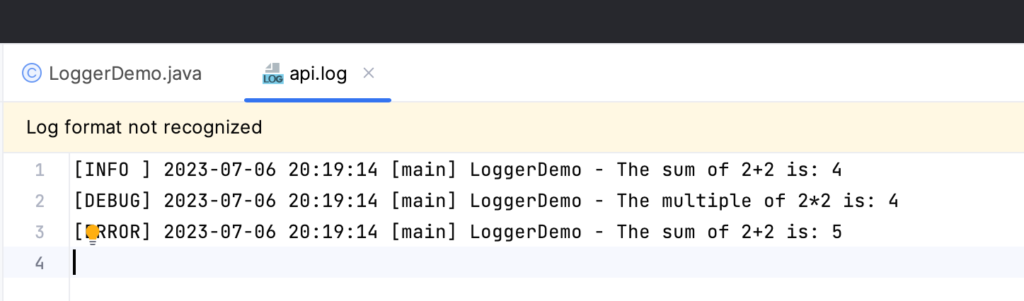
You will see the use of a logger in later classes.
Create Key Interface
public interface Key {
    String name();
}
This interface will be implemented by the ContextKeys and we will use those keys to store the data in steps.
Create ConextKeys Class
Example of ContextKeys class is below: In this implement the Key interface and define the keys for the data you want to store.
public enum ContextKeys implements Key {
    RESPONSE
}
Conext Class to read and share data among the cucumber steps
import java.util.*;

public class CucumberContext {
    private final Map<String,Object> scenarioContext;

    public CucumberContext() {
        this.scenarioContext = new HashMap<>();
    }

    public void set(Key key, Object value) {
        this.scenarioContext.put(key.name(), value);
    }

    public <T> T get(Key key) {
        return (T) Optional.ofNullable(this.scenarioContext.get(key.name()));
    }

    public <T> void addToList(Key key, List<T> values) {
        List<T> existingList = (List<T>) Optional.ofNullable(scenarioContext.get(key.name())).orElse(new ArrayList<>());
        existingList.addAll(values);
        set(key, existingList);
    }

    public <T> void addToList(Key key, T value) {
        List<T> existingList = (List<T>) Optional.ofNullable(scenarioContext.get(key.name())).orElse(new ArrayList<>());
        existingList.add(value);
        set(key, existingList);
    }
}
The above class, CucumberContext, serves as a context manager for storing and retrieving scenario-specific data during Cucumber test execution. Here’s a summary of the class:
- The class contains a
scenarioContextfield, which is aMap<String, Object>that holds the scenario-specific context data. - The constructor initializes the
scenarioContextas a newHashMap. set(): This method allows storing a value in the context using anKeyenum as the key and the corresponding value.get(): This method retrieves a value from the context using theKeyenum as the key and returns it.addToList(): This method adds elements to a list stored in the context using theKeyenum as the key. It can add a single value or a list of values.- When adding elements to a list, the method first retrieves the existing list from the context. If the list does not exist, it creates a new empty
ArrayList. It then adds the new values to the existing list and updates the context with the updated list.
Overall, the CucumberContext class provides a convenient way to store and retrieve scenario-specific data during the execution of Cucumber tests. It allows for easy management of test context data and facilitates communication between different steps or components within a scenario.
Create a property loader class
import lombok.SneakyThrows;
import org.apache.logging.log4j.LogManager;
import org.apache.logging.log4j.Logger;

import java.io.InputStream;
import java.net.URL;
import java.util.ArrayList;
import java.util.Enumeration;
import java.util.List;
import java.util.Properties;

public class PropertyLoader {
    private static final Logger LOGGER = LogManager.getLogger(PropertyLoader.class);

    public static final ThreadLocal<Properties> props = ThreadLocal.withInitial(()->{
        String env = System.getenv("env") == null ? EnvConstants.ENV : System.getenv("env");
        String path = "config/" + env +".properties";
        LOGGER.info("Environment: {}", env);
        LOGGER.info("Loading the pro file");
        Properties properties = new Properties();
        properties.putAll(mergeProps(getProperties(path)));
        LOGGER.info("Loaded the prop file..");
        return properties;
    });

    public static String getProperty(String key) {
        return props.get().getProperty(key);
    }

    public static Properties mergeProps(List<Properties> properties) {
        Properties mergedProps = new Properties();
        properties.forEach(mergedProps::putAll);
        return mergedProps;
    }

    @SneakyThrows
    public static synchronized List<Properties> getProperties(String path) {
        ClassLoader classLoader = Thread.currentThread().getContextClassLoader();
        Enumeration<URL> resources = classLoader.getResources(path);
        if(resources == null || !resources.hasMoreElements())
            throw new Exception("Could not find the property files with names.");
        List<Properties> propertiesList = new ArrayList<>();
        while (resources.hasMoreElements()) {
            URL url = resources.nextElement();
            try(InputStream inputStream = url.openStream()) {
                Properties properties = new Properties();
                properties.load(inputStream);
                propertiesList.add(properties);
            }
        }
        return propertiesList;
    }
}
The above class, PropertyLoader, is a utility class responsible for loading and retrieving properties from property files. Here’s a summary of the class:
- The class uses the ThreadLocal pattern to store properties specific to each thread, ensuring thread safety and avoiding conflicts.
- The
propsfield is aThreadLocalvariable that holds the properties loaded from the property files. - The
getProperty()method retrieves the value of a property based on a given key. - The
mergeProps()method merges multiplePropertiesobjects into a singlePropertiesobject. - The
getProperties()method loads the property files based on the provided path. It uses the class loader to retrieve the resources and reads them asPropertiesobjects. - The class makes use of the logging framework (e.g., Apache Log4j) to log information about the environment and property loading process.
Overall, the PropertyLoader class provides a way to load and access properties from property files. It allows for dynamic loading of properties based on the environment and supports multiple property files. The thread-local approach ensures that properties are isolated and accessible within the context of each thread.
This class will load all the properties from the config/env.properties file which will be present in the resources folder. Here env stands for the environment. You can put the default environment in EnvConstants.java the class as below mentioned. Framework will read the value from the ‘env‘ property but if null then it will pick the environment mentioned in EnvConstants.java class.
import lombok.AccessLevel;
import lombok.NoArgsConstructor;

@NoArgsConstructor(access = AccessLevel.PRIVATE)
public class EnvConstants {
    public static final String ENV = "local";
}
Example of local.properties file:
user=user@gmail.com
password=1286381263898123
dbusername=wdmaster
dbpassword=Aasd819723kd
Like above you can create the properties files for different environments. for example staging.properties.
Create other utils for your framework
1. DateUtil
import lombok.AccessLevel;
import lombok.NoArgsConstructor;

import java.time.LocalDate;
import java.time.format.DateTimeFormatter;

@NoArgsConstructor(access = AccessLevel.PRIVATE)
public class DateUtil {
    private static final String SHORT_DATE_FORMAT = "MM-dd-yyyy";

    public static String getCurrentDate(String format) {
        LocalDate localDate = LocalDate.now();
        DateTimeFormatter dateTimeFormatter = DateTimeFormatter.ofPattern(format);
        return localDate.format(dateTimeFormatter);
    }
}
2. FileUtil
This utility class is used to read the files. This contains two methods for now. Further, add more according to the need.
- readFileFromResources(): This method reads the file passed in the parameter from the resource folder and returns the file’s content in string format.
- readFile(): This is a generic function to read a file from a system
import lombok.AccessLevel;
import lombok.NoArgsConstructor;
import lombok.SneakyThrows;

import java.io.BufferedReader;
import java.io.InputStream;
import java.io.InputStreamReader;
import java.nio.charset.StandardCharsets;
import java.nio.file.Files;
import java.nio.file.Path;
import java.nio.file.Paths;

@NoArgsConstructor(access = AccessLevel.PRIVATE)
public class FileUtil {

    // Read a file from the resources folder
    @SneakyThrows
    public static String readFileFromResources(String fileName) {
        ClassLoader classLoader = FileUtil.class.getClassLoader();
        InputStream inputStream = classLoader.getResourceAsStream(fileName);
        if (inputStream == null) {
            throw new IllegalArgumentException("File not found: " + fileName);
        }
        StringBuilder content = new StringBuilder();
        try (BufferedReader reader = new BufferedReader(new InputStreamReader(inputStream, StandardCharsets.UTF_8))) {
            String line;
            while ((line = reader.readLine()) != null) {
                content.append(line);
                content.append(System.lineSeparator());
            }
        }
        return content.toString();
    }

    // Read a file from the file system
    @SneakyThrows
    public static String readFile(String filePath) {
        Path path = Paths.get(filePath);
        if (!Files.exists(path) || Files.isDirectory(path)) {
            throw new IllegalArgumentException("File not found: " + filePath);
        }
        return Files.readString(path);
    }
}
3. ObjectMapperUtil
This util will help to serialize and deserialize the JSON objects. This util contains two methods:
- toJson(): This will convert any object to JSON format and return it as a string.
- fromJson(): This method converts the String JSON into the Object. This method is a generic method to Whatever class you will pass in the parameter it will convert the JSON into that object and return it.
import com.fasterxml.jackson.databind.ObjectMapper;
import lombok.AccessLevel;
import lombok.NoArgsConstructor;
import lombok.SneakyThrows;

@NoArgsConstructor(access = AccessLevel.PRIVATE)
public class ObjectMapperUtil {

    private static final ObjectMapper objectMapper = new ObjectMapper();

    // Serialize an object to JSON
    @SneakyThrows
    public static String toJson(Object object) {
        return objectMapper.writeValueAsString(object);
    }

    // Deserialize JSON to an object
    @SneakyThrows
    public static <T> T fromJson(String json, Class<T> valueType) {
        return objectMapper.readValue(json, valueType);
    }
}
We have created the basic things in our framework, now let’s develop the API-specific things in the framework
Develop Rest API Client
Create a package com.cucumber.framework.rest in cucumber-api module, and Create the below two files in the same package. And add the module dependency in the cucumber-api module to use the Utils we created.
<dependency>
            <groupId>com.cucumber.framework</groupId>
            <artifactId>utils</artifactId>
            <version>1.0-SNAPSHOT</version>
</dependency>
We will not directly use the RequestSpecification in our code. Instead, build a wrapper or custom rest client on top of it. We will configure the basic things in the wrapper so that duplicate code is not there in the framework.
public class CustomRestClient {
    private final RequestSpecification requestSpecification;
    private final String appUrl;

    public CustomRestClient() {
        this.appUrl = getAppUrl();
        this.requestSpecification = getRequestSpecification();
    }

    public CustomRestClient(String appUrl) {
        this.requestSpecification = getRequestSpecification();
        this.appUrl = appUrl;
    }

    private RequestSpecification getRequestSpecification() {
        RequestSpecBuilder specBuilder = new RequestSpecBuilder().setBaseUri(this.appUrl)
                .setConfig(RestAssuredConfig.config());
        return RestAssured.given().spec(specBuilder.build());
    }

    private String getAppUrl() {
        return PropertyLoader.getProperty("api.url"); // Define this in local.properties file
    }

    private RequestSpecification getRequestSpecWithDefaultHeader() {
        return this.requestSpecification.contentType(ContentType.JSON);
    }

    public RequestSpecification buildDefaultSpec() {
        return getRequestSpecWithDefaultHeader();
    }
}
Create Custom Rest Response Wrapper
This wrapper we will use to store the response. We will see the use of this class in our steps files.
import io.restassured.response.Response;
import lombok.Getter;
import lombok.Setter;

@Getter
@Setter
public class RestResponse {
    private Response response;

    public RestResponse(Response response) {
        this.response = response;
    }

    public <T> T as(Class<T> class) {
        return this.response.getBody().as(class);
    }

    public int getStatusCode() {
        return this.response.getStatusCode();
    }
}
Create Booking Client and Authentication Util Classes:
We Are using the restful-booker website to automate the sample scenario. In order to use this we need a token for some of the API calls. So below is the AuthenticationUtil.java file that is created to get the token. Before that put the below entries in the local.properties file.
api.url=https://restful-booker.herokuapp.com
username=admin
password=password123
AuthenticationUtil.java Class:
import com.cucumber.framework.pojo.CreateTokenRequest;
import com.cucumber.framework.rest.CustomRestClient;
import com.cucumber.framework.utils.PropertyLoader;
import io.restassured.response.Response;
import lombok.AccessLevel;
import lombok.NoArgsConstructor;

@NoArgsConstructor(access = AccessLevel.PRIVATE)
public class AuthenticationUtil {

    public static String getToken() {
        CustomRestClient customRestClient = new CustomRestClient();
        CreateTokenRequest createTokenRequest = new CreateTokenRequest();
        createTokenRequest.setUsername(PropertyLoader.getProperty("username"));
        createTokenRequest.setPassword(PropertyLoader.getProperty("password"));
        Response post = customRestClient.buildDefaultSpec().body(createTokenRequest).post();
        return post.getBody().jsonPath().get("token");
    }
}
BookingClient.java
Write the wrappers for different API calls like Create booking, Update booking, Get booking etc.
import com.cucumber.framework.rest.CustomRestClient;
import com.cucumber.framework.rest.RestResponse;

import static com.cucumber.framework.client.AuthenticationUtil.getToken;

public class BookingClient extends CustomRestClient {
    private static final String CREATE_BOOKING = "/booking";
    private static final String GET_PATCH_UPDATE_BOOKING = "booking/{id}";

    public RestResponse sendGetBookingRequest(String id) {
        return new RestResponse(buildDefaultSpec()
                .basePath(GET_PATCH_UPDATE_BOOKING)
                .pathParam("id", id)
                .put());
    }

    public RestResponse senCreateBookingRequest(String body) {
        return new RestResponse(buildDefaultSpec()
                .basePath(CREATE_BOOKING)
                .body(body)
                .post());
    }

    public RestResponse sendUpdateBookingRequest(String id, String body) {
        return new RestResponse(buildDefaultSpec()
                .basePath(GET_PATCH_UPDATE_BOOKING)
                .header("Cookie", "token=" + getToken())
                .pathParam("id", id)
                .body(body)
                .put());
    }

    public RestResponse sendPatchBookingRequest(String id, String body) {
        return new RestResponse(buildDefaultSpec()
                .basePath(GET_PATCH_UPDATE_BOOKING)
                .header("Cookie", "token=" + getToken())
                .pathParam("id", id)
                .body(body)
                .patch());
    }
}
Write the First API Scenario for Creating a Booking
Create a package feature in test resources like: Cucumber-automation/cucumber-api/src/test/resources/features
Create a file with the name booking.feature and the scenario was written below:
Feature: Restful Booker API

  Scenario: Create Booking
    Given valid booking details
    When I send a Create Booking POST request
    Then the response status code should be 200
    And the response body should contain the newly created booking details
Now next steps are to create the step definitions for the above cucumber scenario steps.
Create BookingStep.java
This file contains a method to get the booking request JSON string. In this, we are creating random JSON for random booking requests.
import com.cucumber.framework.pojo.common.Booking;
import com.cucumber.framework.utils.FileUtil;
import com.cucumber.framework.utils.ObjectMapperUtil;
import org.apache.commons.lang3.RandomStringUtils;

public class BookingSteps {

    public String getBookingRequest() {
        var bookingRequest = FileUtil.readFileFromResources("data/createBooking.json");
        Booking bookingReRes = ObjectMapperUtil.fromJson(bookingRequest, Booking.class);
        bookingReRes.setFirstname(bookingReRes.getFirstname() + RandomStringUtils.randomAlphabetic(4));
        bookingReRes.setLastname(bookingReRes.getLastname() + RandomStringUtils.randomAlphabetic(4));
        return ObjectMapperUtil.toJson(bookingReRes);
    }
}
In this, We are reading the sample request ‘createBooking.json‘ created in src/main/resources/data folder
{
  "firstname" : "Jim",
  "lastname" : "Brown",
  "totalprice" : 111,
  "depositpaid" : true,
  "bookingdates" : {
    "checkin" : "2018-01-01",
    "checkout" : "2019-01-01"
  },
  "additionalneeds" : "Breakfast"
}
In order to read this JSON file we need to create the Pojo object so that we can edit the POJO and again convert it back to JSON string.
To create POJO create a separate package and put the below two files in that package:
import lombok.Data;

@Data
public class Booking {
    private String firstname;
    private String additionalneeds;
    private Bookingdates bookingdates;
    private int totalprice;
    private boolean depositpaid;
    private String lastname;
}
import lombok.Data;
@Data
public class Bookingdates {
private String checkin;
private String checkout;
}To Store the Booking request response we need to create CreateBookingRes.java POJO
import com.cucumber.framework.pojo.common.Booking;
import lombok.Data;

@Data
public class CreateBookingRes {
    private Booking booking;
    private int bookingid;
}
Create Booking Definitions
Create a package com cucumber.framework.definitions and Create a file names BookingDefinitions.java.
IntelliJ gives you suggestions to autogenerate the definitions file with empty steps. And then you can write the steps and definitions. So after implementing the BookingDefinitions.java file will be like this:
import com.cucumber.framework.client.BookingClient;
import com.cucumber.framework.pojo.common.Booking;
import com.cucumber.framework.pojo.createbooking.CreateBookingRes;
import com.cucumber.framework.rest.RestResponse;
import com.cucumber.framework.steps.BookingSteps;
import com.cucumber.framework.utils.CucumberContext;
import com.cucumber.framework.utils.ObjectMapperUtil;
import io.cucumber.java.en.And;
import io.cucumber.java.en.Given;
import io.cucumber.java.en.Then;
import io.cucumber.java.en.When;
import lombok.AllArgsConstructor;
import org.hamcrest.Matchers;

import static com.cucumber.framework.client.APIContextKeys.*;
import static org.hamcrest.MatcherAssert.assertThat;

@AllArgsConstructor
public class BookingDefinitions {
    private final CucumberContext cucumberContext = new CucumberContext();
    private final BookingClient bookingClient = new BookingClient();
    private final BookingSteps bookingSteps = new BookingSteps();

    @Given("valid booking details")
    public void validBookingDetails() {
        cucumberContext.set(BOOKING_REQ, bookingSteps.getBookingRequest());
    }

    @When("I send a Create Booking POST request")
    public void iSendACreateBookingPOSTRequest() {
        RestResponse restResponse = bookingClient.senCreateBookingRequest(cucumberContext.get(BOOKING_REQ));
        restResponse.getResponse().getBody().prettyPrint();
        cucumberContext.set(REST_RESPONSE, restResponse);
    }

    @Then("the response status code should be {int}")
    public void theResponseStatusCodeShouldBe(int expectedStatusCode) {
        RestResponse restResponse = cucumberContext.get(REST_RESPONSE);
        assertThat(restResponse.getStatusCode(), Matchers.equalTo(expectedStatusCode));
    }

    @And("the response body should contain the newly created booking details")
    public void theResponseBodyShouldContainTheNewlyCreatedBookingDetails() {
        RestResponse restResponse = cucumberContext.get(REST_RESPONSE);
        CreateBookingRes actualBookingReRes = ObjectMapperUtil.fromJson(restResponse.getResponse().body().asString(), CreateBookingRes.class);
        Booking expectedBookingReRes = ObjectMapperUtil.fromJson(cucumberContext.get(BOOKING_REQ), Booking.class);
        assertThat(actualBookingReRes.getBooking(), Matchers.equalTo(expectedBookingReRes));
    }
}
Here’s an explanation of the step definitions in the given code:
@Given("valid booking details")- This step definition is associated with a scenario step that sets up valid booking details.
- It uses the
CucumberContextobject to store the booking request details obtained from theBookingStepsclass.
@When("I send a Create Booking POST request")- This step definition represents the action of sending a POST request to create a booking.
- It uses the
BookingClientto send the create booking request. - The response received is stored in the
RestResponseobject. - The response body is pretty printed for debugging purposes.
- The
RestResponseobject is then stored in theCucumberContextfor further use.
@Then("the response status code should be {int}")- This step definition verifies that the response status code matches the expected status code.
- The expected status code is passed as a parameter to the step definition.
- It retrieves the
RestResponseobject from theCucumberContextand checks the status code using theassertThatmethod.
@And("the response body should contain the newly created booking details")- This step definition verifies that the response body contains the details of the newly created booking.
- It retrieves the
RestResponseobject from theCucumberContext. - The response body is deserialized into a
CreateBookingResobject usingObjectMapperUtil. - The expected booking details are obtained from the
CucumberContextand deserialized into aBookingobject. - The step definition uses
assertThatto compare the actual and expected booking details.
Please note that these step definitions are part of a larger Cucumber test suite and are used to define the behaviour and verification steps for the corresponding scenario steps. The CucumberContext is used to share data between steps within a scenario. The BookingClient and BookingSteps classes provide the necessary functionality and methods to interact with the booking API and perform the required actions.
Allure Report Configuration
In this, we are using an allure report. You can choose any other reporting as well. It totally depends on your project requirements.
To configure add allure dependency in the parent pom.xml:
<dependency>
     <groupId>io.qameta.allure</groupId>
     <artifactId>allure-cucumber7-jvm</artifactId>
     <version>2.23.0</version>
</dependency>
Since we are using Cucumber 7 version so we need to use allure-cucumber7-jvm and the version of Cucumber should also be compatible with this.
Now add, the below code snipped in parent pom.xml after the dependencies tag:
<build>
        <plugins>
            <plugin>
                <groupId>io.qameta.allure</groupId>
                <artifactId>allure-maven</artifactId>
                <version>2.12.0</version>
                <configuration>
                    <reportVersion>2.16.0</reportVersion>
                    <reportDirectory>${project.build.directory}/allure-report</reportDirectory>
                </configuration>
            </plugin>
        </plugins>
</build>
and add the allure.properties file in src/main/resources/allure.properties each module where tests are there.
For example in cucumber-api and cucumber-ui. Now how to use the allure report:
allure.results.directory=target/allure-resultsTo make use of allure, we need to define this in the runner plugin section:
Using Runner
import io.cucumber.junit.Cucumber;
import io.cucumber.junit.CucumberOptions;
import org.junit.runner.RunWith;
@RunWith(Cucumber.class)
@CucumberOptions(
features = "src/test/resources/features",
glue = "com.cucumber.framework.definitions",
plugin = {"io.qameta.allure.cucumber7jvm.AllureCucumber7Jvm"}
)
public class TestRunner {
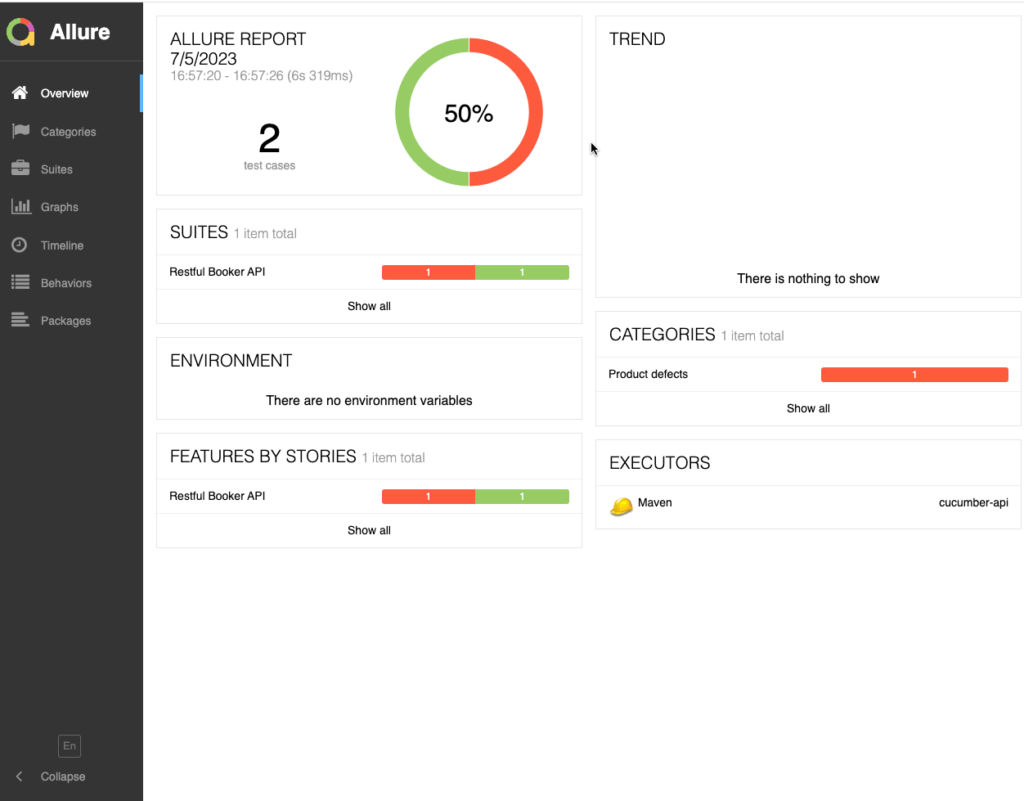
}Open Allure Report
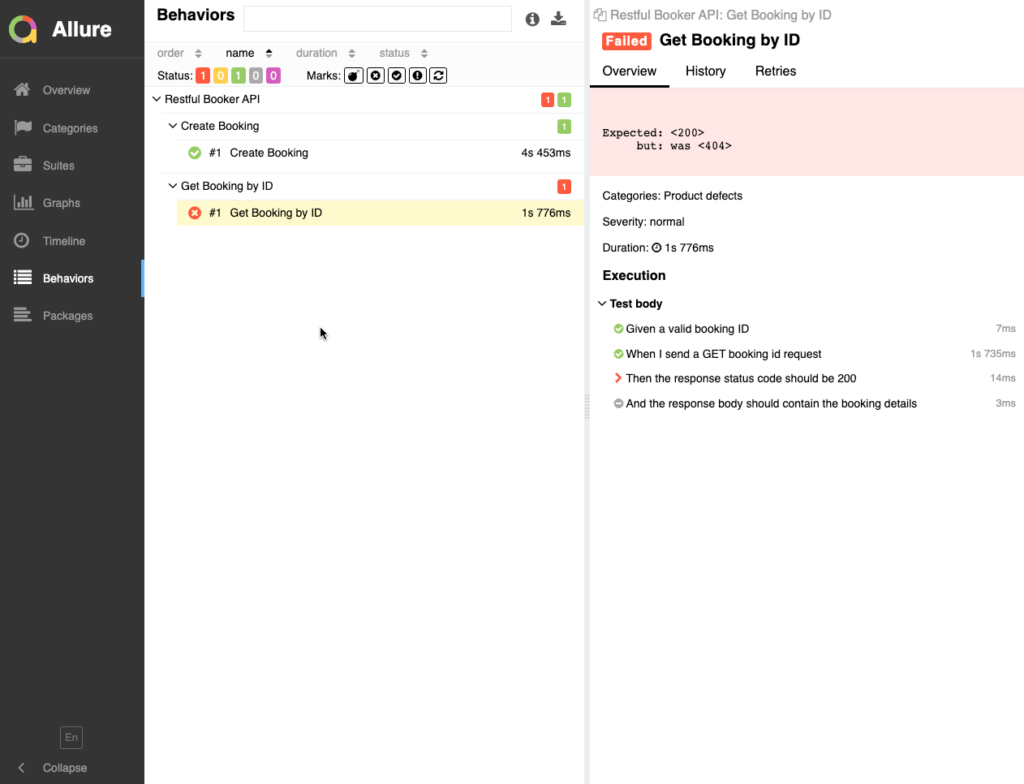
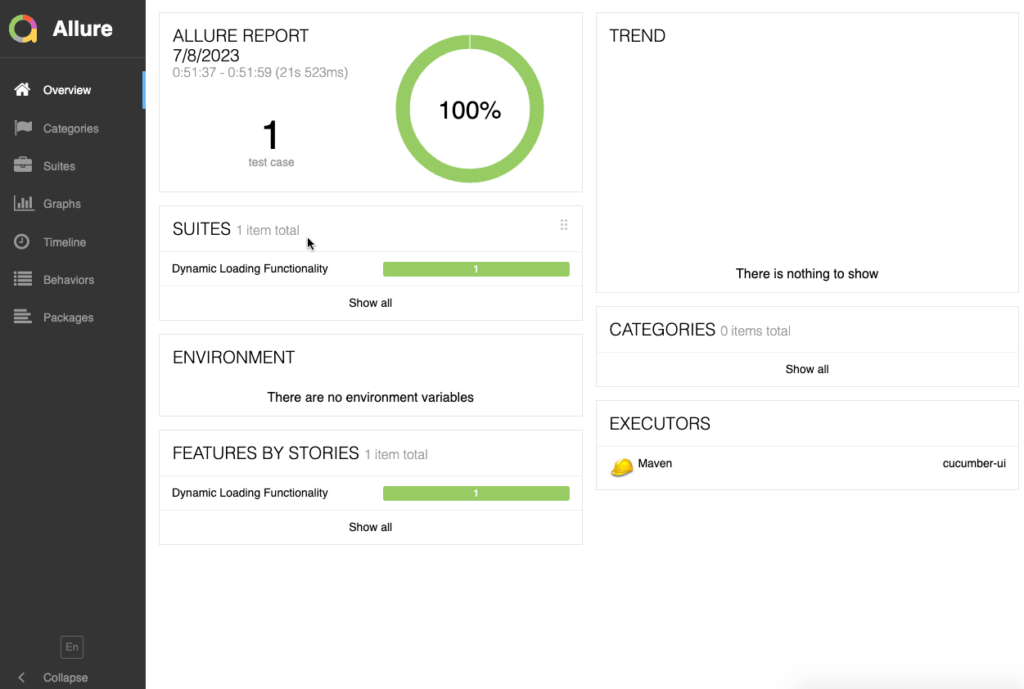
mvn allure:reportAllure Report Example
Below is an example of what an allure report looks like.
Develop cucumber-ui module (UI or Web Automation Using Selenide)
Tool
Selenide: It is a wrapper of selenium and an open-source framework. Here you can read the comparison of Selenium and Selenide for more detail.
Add Maven Dependencies
- utils module: to use the common utilities
- selenide: Tool to automate UI apps. It is a selenium wrapper.
- allure-selenide: It is an allure selenide listener to generate the allure report.
<dependencies>
<dependency>
<groupId>com.cucumber.framework</groupId>
<artifactId>utils</artifactId>
<version>1.0-SNAPSHOT</version>
</dependency>
<dependency>
<groupId>com.codeborne</groupId>
<artifactId>selenide</artifactId>
<version>6.16.0</version>
</dependency>
<dependency>
<groupId>io.qameta.allure</groupId>
<artifactId>allure-selenide</artifactId>
<version>2.23.0</version>
</dependency>
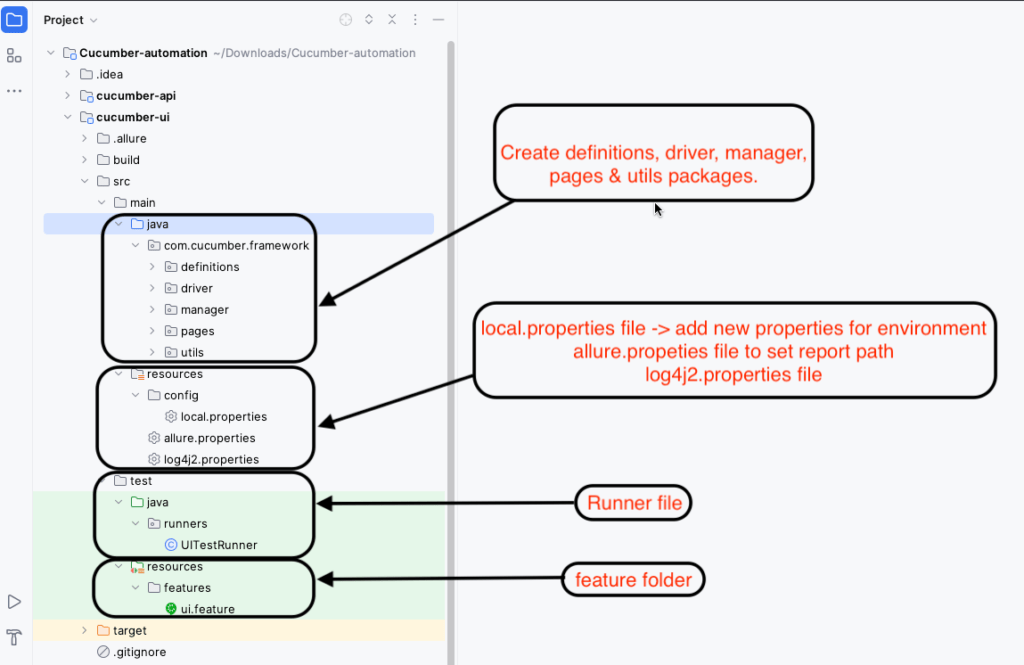
</dependencies>Create Framework Structure
Write Sample Scenario – Create a feature file
Let’s create a sample scenario for https://the-internet.herokuapp.com website.
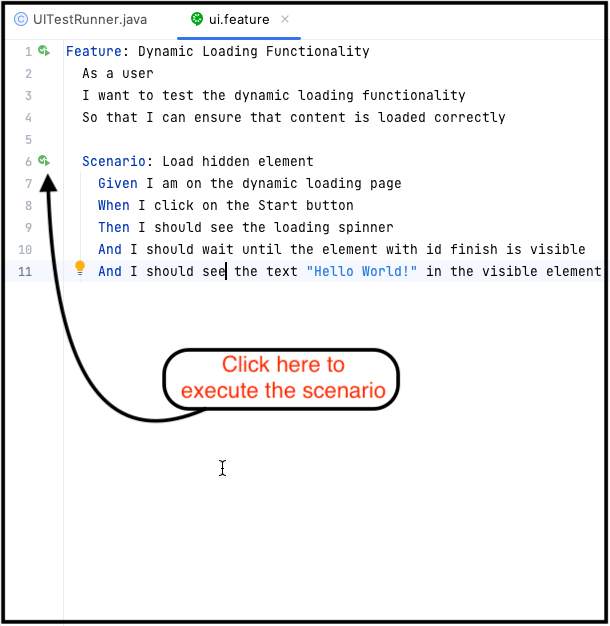
Feature: Dynamic Loading Functionality
  As a user
  I want to test the dynamic loading functionality
  So that I can ensure that content is loaded correctly

  Scenario: Load hidden element
    Given I am on the dynamic loading page
    When I click on the Start button
    Then I should see the loading spinner
    And I should wait until the element with id finish is visible
    And I should see the text "Hello World!" in the visible element
local.properties file
Before we need to set some properties for UI.
app.url=https://the-internet.herokuapp.com
browser=chrome
timeout=30000
headless=false
pageLoadTimeout=45000
allure.properties file
allure.results.directory=target/allure-resultslog4j2.properties file
# Set the root logger level and appender
name=PropertiesConfig
appenders=console, file
appender.console.type=Console
appender.console.name=STDOUT
appender.console.layout.type=PatternLayout
appender.console.layout.pattern=[%-5level] %d{yyyy-MM-dd HH:mm:ss} [%t] %c{1} - %msg%n
appender.file.type=File
appender.file.name=FileLogger
appender.file.fileName=ui-logs.text
appender.file.layout.type=PatternLayout
appender.file.layout.pattern=[%-5level] %d{yyyy-MM-dd HH:mm:ss} [%t] %c{1} - %msg%n
appender.file.append=true
rootLogger.level=trace
rootLogger.appenderRefs=stdout, file
rootLogger.appenderRefs.file.ref=FileLogger
rootLogger.appenderRefs.stdout.ref=STDOUT
Driver Class
Create Driver.java class in the driver package.
import com.codeborne.selenide.Configuration;
import com.codeborne.selenide.WebDriverRunner;
import com.cucumber.framework.utils.PropertyLoader;
import lombok.AccessLevel;
import lombok.NoArgsConstructor;

@NoArgsConstructor(access = AccessLevel.PRIVATE)
public class Driver {

    public static void setupDriver() {
        Configuration.browser = PropertyLoader.getProperty("browser");
        Configuration.baseUrl = PropertyLoader.getProperty("app.url");
        Configuration.timeout = Long.parseLong(PropertyLoader.getProperty("timeout"));
        Configuration.pageLoadTimeout = Long.parseLong(PropertyLoader.getProperty("pageLoadTimeout"));
        Configuration.driverManagerEnabled = true;
        if (PropertyLoader.getProperty("headless").equals("true"))
            Configuration.headless = true;
    }

    public static void quitDriver() {
        WebDriverRunner.closeWebDriver();
    }
}
The above code represents a utility class with two static methods: setupDriver() and quitDriver(). Let’s break down the code and explain each method:
public static void setupDriver()- This method is responsible for setting up the WebDriver configuration using the values retrieved from a property file (via
PropertyLoader.getProperty()). The method performs the following tasks:- Sets the browser to be used by assigning the value of the “browser” property to
Configuration.browser. - Sets the base URL of the application under test by assigning the value of the “app.url” property to
Configuration.baseUrl. - Sets the timeout duration for element lookups and assertions by assigning the value of the “timeout” property (parsed as a
Long) toConfiguration.timeout. - Sets the timeout duration for page loading by assigning the value of the “pageLoadTimeout” property (parsed as a
Long) toConfiguration.pageLoadTimeout. - Enables the driver manager by setting
Configuration.driverManagerEnabledit totrue. This allows Selenide to automatically download and manage WebDriver binaries based on the specified browser. - Checks if the “headless” property is set to “true” in the property file. If it is, sets
Configuration.headlesstotrue, enabling headless mode for the browser. Headless mode runs the browser without a graphical user interface, which can be useful for running tests in environments without a display.
- Sets the browser to be used by assigning the value of the “browser” property to
- This method is responsible for setting up the WebDriver configuration using the values retrieved from a property file (via
public static void quitDriver()- This method is responsible for quitting and closing the WebDriver instance. It uses
WebDriverRunner.closeWebDriver()to close the current WebDriver session gracefully.
- This method is responsible for quitting and closing the WebDriver instance. It uses
These methods can be used to set up and configure the WebDriver for your Selenide tests. The setupDriver() method reads the necessary configuration properties from a property file, allowing you to easily change the browser, URLs, timeouts, and headless mode settings. The quitDriver() method ensures proper cleanup by closing the WebDriver session after the test execution is complete.
Create ReportUtil
import com.codeborne.selenide.logevents.SelenideLogger;
import io.qameta.allure.selenide.AllureSelenide;
import lombok.AccessLevel;
import lombok.NoArgsConstructor;

@NoArgsConstructor(access = AccessLevel.PRIVATE)
public class ReportUtil {

    public static void setupAllureReport() {
        SelenideLogger.addListener("AllureSelenide", new AllureSelenide()
                .screenshots(true));
    }
}
Let’s break down the class and its components:
@NoArgsConstructor(access = AccessLevel.PRIVATE)- This annotation is from the Lombok library and automatically generates a no-args private constructor for the class. It prevents the instantiation of the
ReportUtilclass from outside, ensuring that the class can only be accessed through its static methods.
- This annotation is from the Lombok library and automatically generates a no-args private constructor for the class. It prevents the instantiation of the
public class ReportUtil- This is the declaration of the
ReportUtilclass.
- This is the declaration of the
public static void setupAllureReport()- This is a public static method
setupAllureReport(). It is responsible for setting up the Allure report integration with Selenide. The method does the following:- Adds a listener called “AllureSelenide” to SelenideLogger using
SelenideLogger.addListener(). This listener is provided by the AllureSelenide library and enables capturing screenshots during test execution. - Configures the listener to capture screenshots bypassing
screenshots(true)them as a parameter to theAllureSelenidelistener.
- Adds a listener called “AllureSelenide” to SelenideLogger using
- This is a public static method
The purpose of this class is to encapsulate the setup of the Allure report integration with Selenide. By calling the setupAllureReport() method, you can conveniently configure Selenide to capture screenshots for Allure reporting throughout your test suite.
Note: The usage of Lombok’s @NoArgsConstructor(access = AccessLevel.PRIVATE) and the specific configurations for Allure and Selenide may vary based on the context and specific requirements of your project.
Create UIHooks.java class
import com.cucumber.framework.driver.Driver;
import com.cucumber.framework.utils.ReportUtil;
import io.cucumber.java.After;
import io.cucumber.java.Before;
import io.cucumber.java.BeforeAll;

public class UIHooks {

    @BeforeAll
    public static void setupAllureLogger() {
        ReportUtil.setupAllureReport();
    }

    @Before
    public void setDriver() {
        Driver.setupDriver();
    }

    @After
    public void closeDriver() {
        Driver.quitDriver();
    }
}
Create WebPage.java class
Create WebPage.java abstract class in the pages package and create the package navigate(URL), navigate() and refresh() page.
import com.codeborne.selenide.Selenide;
import com.codeborne.selenide.WebDriverRunner;
import com.cucumber.framework.utils.PropertyLoader;
import lombok.AccessLevel;
import lombok.NoArgsConstructor;

@NoArgsConstructor(access = AccessLevel.PROTECTED)
public abstract class WebPage {

    public void navigate(String url) {
        Selenide.open(PropertyLoader.getProperty("app.url") + url);
        WebDriverRunner.driver().getWebDriver().manage().window().maximize();
    }

    public void navigate() {
        Selenide.open();
        WebDriverRunner.driver().getWebDriver().manage().window().maximize();
    }

    public void refresh() {
        Selenide.refresh();
    }
}
Implement Page Object Model
Create DynamicLoadingPage.java page
import com.codeborne.selenide.SelenideElement;
import static com.codeborne.selenide.Selenide.$;

public class DynamicLoadingPage extends WebPage {
    private final SelenideElement startButton = $("#start button");
    private final SelenideElement finishText = $("#finish");
    private final SelenideElement loadingSpinner = $("#loading");

    @Override
    public void navigate() {
        super.navigate("/dynamic_loading/1");
    }

    public void clickStartButton() {
        startButton.click();
    }

    public boolean isFinishTextVisible() {
        return finishText.isDisplayed();
    }

    public String getFinishText() {
        return finishText.getText();
    }

    public boolean isLoadingSpinnerDisplayed() {
        return loadingSpinner.isDisplayed();
    }
}
The above class, DynamicLoadingPage, extends the WebPage class, indicating that it represents a specific web page in the application. Here’s a summary of the class:
- The class extends
WebPage, suggesting that it inherits common functionalities and behaviours from theWebPageclass. - The class has three private instance variables of type
SelenideElement:startButton,finishText, andloadingSpinner. These variables represent specific elements on the web page, identified using CSS selectors. - The
navigate()the method is overridden from the WebPage class and defines the navigation behaviour for this specific page. In this case, it navigates to the URL “/dynamic_loading/1”. - The
clickStartButton()method clicks on thestartButtonelement. - The
isFinishTextVisible()method checks if thefinishTextelement is currently visible on the page. - The
getFinishText()the method retrieves the text content of thefinishTextelement. - The
isLoadingSpinnerDisplayed()method checks if theloadingSpinnerelement is currently displayed on the page.
This class encapsulates the specific elements and behaviours related to the “Dynamic Loading” page of the application. It provides convenient methods to interact with the page elements and retrieve information from the page.
PageManager.java class
import com.cucumber.framework.pages.DynamicLoadingPage;

public class PageManager {

    public DynamicLoadingPage dynamicLoadingPage() {
        return new DynamicLoadingPage();
    }
}
The above class, PageManager, serves as a factory or manager class for creating and accessing page objects. Here’s a summary of the class:
- The class provides a method called
dynamicLoadingPage()that returns an instance of theDynamicLoadingPageclass. - The method
dynamicLoadingPage()is a factory method that creates and returns a new instance of theDynamicLoadingPageclass. - The
PageManagerclass acts as a centralized location for managing and accessing different page objects. - By encapsulating the creation of page objects within the
PageManagerclass, it promotes better organization and separation of concerns in your test framework. - Other parts of the code can access page objects by calling the appropriate method on an instance of the
PageManagerclass. - By using the
PageManagerclass, you can ensure that page objects are consistently created and managed throughout your test suite.
In summary, the PageManager class provides a way to create and access page objects, such as the DynamicLoadingPage, in a centralized manner. It helps promote better organization and maintenance of page objects within your test framework.
Write Step Definition
import com.cucumber.framework.manager.PageManager;
import io.cucumber.java.en.And;
import io.cucumber.java.en.Given;
import io.cucumber.java.en.Then;
import io.cucumber.java.en.When;
import lombok.SneakyThrows;

import static org.junit.jupiter.api.Assertions.assertEquals;
import static org.junit.jupiter.api.Assertions.assertTrue;

public class DynamicLoadingStepDef {
    private final PageManager pageManager = new PageManager();

    @Given("I am on the dynamic loading page")
    public void iAmOnTheDynamicLoadingPage() {
        pageManager.dynamicLoadingPage().navigate();
    }

    @When("I click on the Start button")
    public void iClickOnTheStartButton() {
        pageManager.dynamicLoadingPage().clickStartButton();
    }

    @Then("I should see the loading spinner")
    public void iShouldSeeTheLoadingSpinner() {
        assertTrue(pageManager.dynamicLoadingPage().isLoadingSpinnerDisplayed());
    }

    @SneakyThrows
    @And("I should wait until the element with id finish is visible")
    public void iShouldWaitUntilTheElementWithIdIsVisible() {
        Thread.sleep(10000);
        assertTrue(pageManager.dynamicLoadingPage().isFinishTextVisible());
    }

    @And("I should see the text {string} in the visible element")
    public void iShouldSeeTheTextInTheVisibleElement(String expectedText) {
        String actualText = pageManager.dynamicLoadingPage().getFinishText();
        assertEquals(expectedText, actualText);
    }
}
This class contains the step definitions for sample scenarios. It is similar to the API scenarios we created.
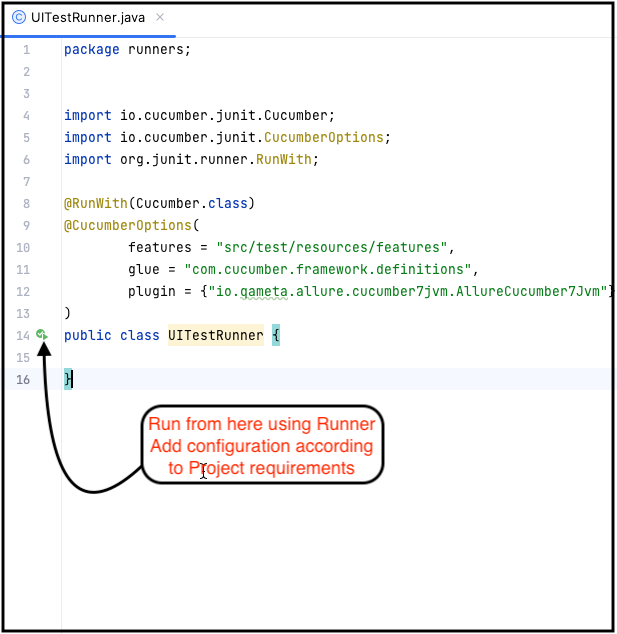
UITestRunner.java class
import io.cucumber.junit.Cucumber;
import io.cucumber.junit.CucumberOptions;
import org.junit.runner.RunWith;

@RunWith(Cucumber.class)
@CucumberOptions(
        features = "src/test/resources/features",
        glue = "com.cucumber.framework.definitions",
        plugin = {"io.qameta.allure.cucumber7jvm.AllureCucumber7Jvm"}
)
public class UITestRunner {

}
The above class, UITestRunner, serves as the entry point for executing Cucumber tests. Here’s a summary of the class:
- The class is annotated, indicating that it should be executed using the Cucumber test runner.
- The
@CucumberOptionsannotation is used to configure various options for the Cucumber execution. - The
featuresthe attribute specifies the path to the feature files that contain the Cucumber scenarios. In this case, the feature files are located in the “src/test/resources/features” directory. - The
gluethe attribute specifies the package where the step definitions are located. In this case, the step definitions are in the “com.cucumber.framework.definitions” package. - The
pluginattribute specifies the plugin to be used for reporting. In this case, it uses the Allure plugin for Cucumber (io.qameta.allure.cucumber7jvm.AllureCucumber7Jvm). - The
UITestRunnerclass acts as the test runner, responsible for executing the Cucumber scenarios and generating the test reports.
To run the tests, you would execute this UITestRunner class using your preferred test execution mechanism (e.g., IDE test runner, build tool, command line). The Cucumber framework will then execute the scenarios defined in the feature files and generate the test reports using the specified plugins.
Please note that the exact configuration and behaviour may vary depending on the version and setup of the Cucumber framework and any additional plugins or dependencies used in the project.
Execution
You can execute the scenario from UITestRunner and from the feature file itself too.
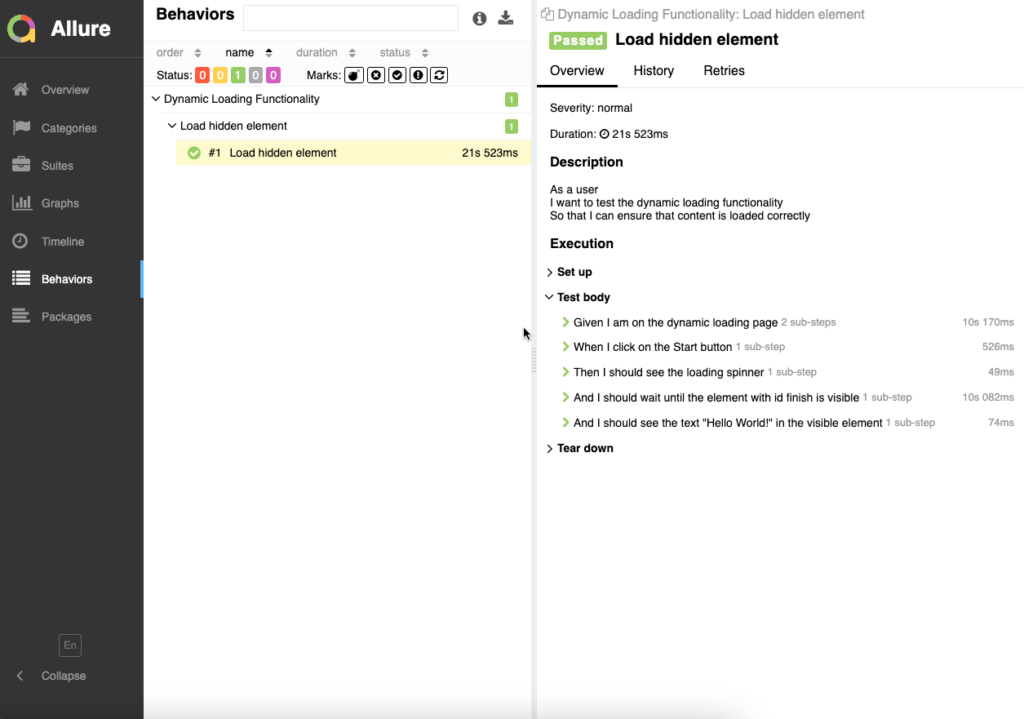
Allure Report
Conclusion
I hope you liked the article and it helps you to start the automation in the cucumber BDD maven modular framework. Now it’s on how you want to add more capabilities to it.


Post Comment